Cart

Course Not Marking as Complete

By Technical Support

Potential Reasons Why

  1. Student took a test without passing all their assignments
    1. ESO courses will not mark as complete and will not update to Skyward until every assignment is done and passing, even if they take their final test. Have the student finish the assignments and that should fix it. Make sure you are being thorough before releasing tests so that this does not happen. Students are not allowed to test until every assignment is passing.
  2. An assignment’s passing score is showing red instead of green
    1. This is a setting issue from the teacher’s end where the assignment’s passing score is set higher than 70% when it shouldn’t be. 
    2. Contact supervisor and they should be able to go in and override it.
  3. A course with completed passing assignments has assignments that still have a grading page icon next to them, or they have assignments that do not have a check mark listed next to them
    1. To fix, click on the offending assignment and select Override Complete

Course Not Appearing for Student in Buzz

By Technical Support

When a student calls in saying they purchased a unit but it is not showing up in Buzz, here are the variety of reasons why and how they can be solved

  1. Student already completed this unit in the past
    1. In this case, give the student a coupon code from the $5 Credit tab on the Free CU sheet to use towards a different unit they haven’t already completed. (They cannot take the same unit twice for credit)
  2. Payment did not go through/was canceled but when they try to purchase again, it tells them they already have an active subscription, despite it not showing up in Buzz
    1. See How to Solve the “False Active” Issue article for steps on how to fix this
  3. Sometimes, you can confirm payment and it appears that there should be nothing wrong, and it just means there was a connection issue between the shopping cart and Buzz. You can go in and manually extend the unit in Buzz or manually add the unit if applicable
    1. Just make sure a subscription was added to the student in the shopping cart

Common Tech Issues

By Technical Support

Common Tech Issues

Have the student wait a few minutes before trying again. More often than not, this will fix the submission issue. 

  1. First, check to see if the student paid to renew the course in the shopping cart. If you can confirm payment, go ahead and manually update the unit in Buzz and give them a month from the current day since they haven’t been able to access it until now.
  2. If that doesn’t work, sometimes, you’re seeing the course show up and when you proxy as them the course is showing up but for some reason on the student’s end, they are not seeing the course even though by all accounts and reasons there shouldn’t be a problem. 
  3. When this happens, have the student check the date and time on their computer. There have been multiple instances where because the date and time on the computer is wrong, and the start date on the course is set to a specific date, the computer falsely thinks it’s not time for the course to start yet and so it doesn’t show up on their account. If they fix their date and time on the computer, it should resolve the issue.

Have the customer use the magnifying glass in the top right corner of the website and search the course instead. Make sure they hit Enter as not all options will appear as a suggested filler. The button may work again later so they can try using it again at another time.

  • Old/New Course Document
    • Courses that are going to be removed are listed here and specify which date they will no longer be available. 
    • Check on the “Discontinued” tab at the bottom
  • Courses with an * in front of their name are older versions of that unit and are therefore not available for purchase anymore. There is another newer version of that unit available for purchase that the customer can purchase instead, it will not have an * in front of the name.

Send the student’s info to the HD employees over the “Username Changes” project. It is best if you don’t change anything and let them handle it all instead as there are a lot of steps for them to follow to make sure everything is transferred properly. You can let the customer know they are quick about it and can easily get it done within a business day.

  • Have the student wait a little longer first as it can take a long time for the code email to be sent to them. If they are still not seeing it, we can manually verify for them by just selecting “Verify” on their Buzz details page. Make extra certain that the email on file is correct before you do this. 
  • This will not affect their ability to access their courses or assignments. If they are having an email verification issue with an assignment, it is not the same problem as this and is most likely a problem with TurnItIn not being able to access their work, which you can verify by proxying as them and checking the assignment. See the “TurnItIn Error Fix” section for instructions on how the student can resolve this in their settings.
  1. First, have the student check in the top right corner of their Google Chrome browser to see if they are signed into their Alpine District email. If they are and it still isn’t working, have the student send a screenshot of what they are seeing (please tell them to take the screenshot of the FULL browser window.) 
  2. Check on the following:
    • The bar at the top of the screenshot that has the name and information regarding the assignment
    • The grades page for the unit
    • Proxy as the student and look at what activities are included in the course feed. 
  3. If you are seeing that the title of the assignment includes words like “Not visible” or “Hidden info” and this assignment is not included in the grades or the course feed along with the rest of the activities, then it is an old assignment that the student does not need to worry about completing. Have them go back to their course feed and manually select the next activity instead. 
  4. Please then contact the teacher. This is a visibility setting issue. Often the page is in a folder that is hidden, but because the lesson is not hidden, it shows up as a page for them to go to next but then won’t open. 
    • The teacher just needs to go into edit mode and then click on the “eye” to remove visibility for any assignments that are showing up as “access denied” when the page shouldn’t be showing to students at all. Clicking the eye so it turns red with a line through it should solve the problem.
  • Issues with the Orientation Course?
    • Students need to take their orientation course once a year. When they renew their registration, it will automatically add a new orientation course to their Buzz account. If there are issues with the course renewing or getting in the student’s way, here are some fixes:
      • If the orientation is about a year old, manually delete it from their account and manually add a new one to their account and make sure it expires at the time that their registration expires since this is when they will be when a new one is added.
      • If the orientation is fairly new, manually extend it until the end of their registration date.
      • You are able to excuse any assignments in the orientation as well, so if the student has already done it and Buzz added a new one and is asking them to do it again, you can excuse assignments and let them move on. Be sure to communicate and work with the student on these issues, we don’t want to hold them back from their work. 
  • Sometimes when a student leaves a submission and then comes back to it to try it again, it will have a screen pop up that says “Would you like to pick up where you left off?” and the student’s first instinct is to hit “Resume” because they don’t want to lose their work. However, this prevents the assignment from resetting and therefore doesn’t allow them to save their new submission. 
  • Have the student select “No” instead and this will cause the video player or the module or the quiz to reset and actually allow them to redo the assignment.


Clearing the Cache in your Browser

By Technical Support

The cache saves versions of pages to help load them faster. Even after an update is made to a page, sometimes the page will load from the cache instead of loading the updated version. Clearing the cache forces the browser to load the updated version of the page.

If someone needs to clear the cache for your browser, follow these steps.

For Chrome:

  1. On your computer, open Chrome.
  2. Copy chrome://settings/clearBrowserData and paste into the address bar.
  3. Once there, at the top, choose a time range.
    1. To delete everything, select All time.
  4. Next to “Cookies and other site data” and “Cached images and files,” check the boxes.
  5. Click Clear data.
  6. Exit/quit all browser windows and re-open the browser.

For Firefox:

  1. From the History menu, select Clear Recent History.
    1. If the menu bar is hidden, press Alt to make it visible.
  2. From the Time range to clear: drop-down menu, select the desired range.
    1. To clear your entire cache, select Everything.
  3. Next to “Details”, click the down arrow to choose which elements of the history to clear; to clear your entire cache, select all items.
    1. To clear your entire cache, select all items.
  4. Click Clear Now.
  5. Exit/quit all browser windows and re-open the browser.

TurnItIn Error Fix

By Technical Support


Occasionally a student may receive the following error message: “Sorry, we could not process your request. We can’t find a valid email address for you. Set your email address in your learning management system (LMS), and then try again.”

To fix, students need to:

  1. Click on their name in the top right corner of Buzz
  2. Then select settings 
  3. Uncheck the box that says “Hides my email address from external LTI websites”
  4. Select save in the top right corner

Proxying as a Student

By Buzz, Technical Support
  1. In Buzz
    1. Copy the student’s User ID (NOT the Username).
      1. User ID is typically a longer number and can be found under the username on the details page in Buzz.
    2. Click on your name in the top right corner.
    3. In the drop down menu select ‘Proxy.’
    4. Paste their User ID in the box and select ‘OK.’
      1. While you are proxying, please remember it is as if you are the student so be careful what you do in their account, you don’t want to mess anything up for them.
    5. When you are finished, make sure to go back to your name and select ‘Unproxy.’
  2. In the Shopping Cart
    1. Select Users
    2. Search for the student ID in the search on the right side of the screen
    3. Hover over their name and several options will appear under their ID number/beside their blank portrait
    4. Select Switch To
    5. This will automatically take you to the ESO website and you will be proxying as the student now
    6. From here, you can see the student Subscriptions, their Account Details, you can add units to their shopping cart, and you can make purchases
      1. Remember, you are acting as the student so be mindful
    7. When making a purchase, be sure you are on the phone with the student to get their proper billing information. We will not accept billing info through an email or LiveChat, it must be over the phone for security purposes
    8. When you are finished, MAKE SURE to scroll all the way down to the bottom and select “Switch back to yourself”

Allowing Teacher to View a Google Drive Assignment

By Technical Support, Units

(This is a common problem for the video assignments in the Fitness for Life units.)

  1. Go to the document in your Google Drive. In the top right corner, click on the blue “Share” button.
  2. There are a couple ways to share the document. To avoid further problems, we suggest doing both options to ensure the teacher can see the assignment.
    <

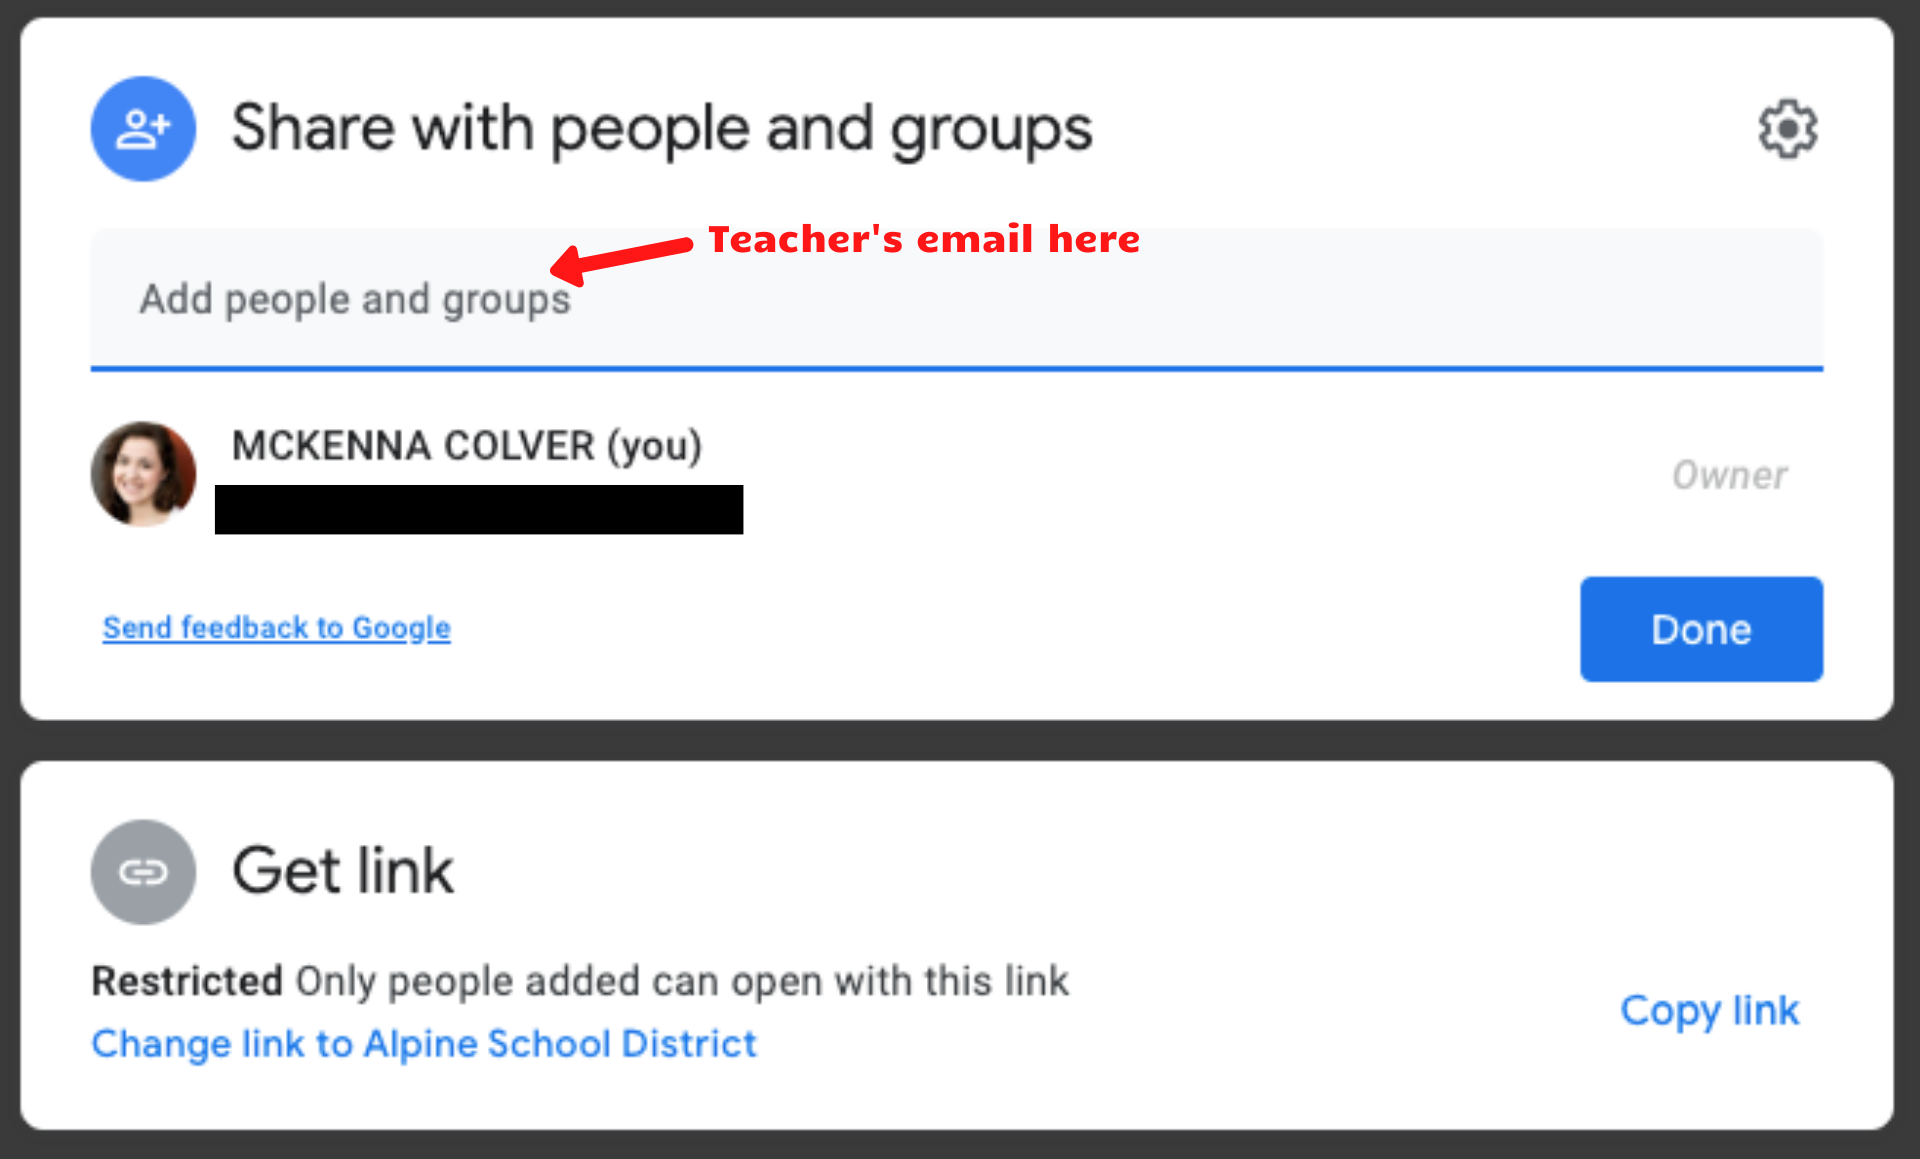
    1. Share with people and groups:
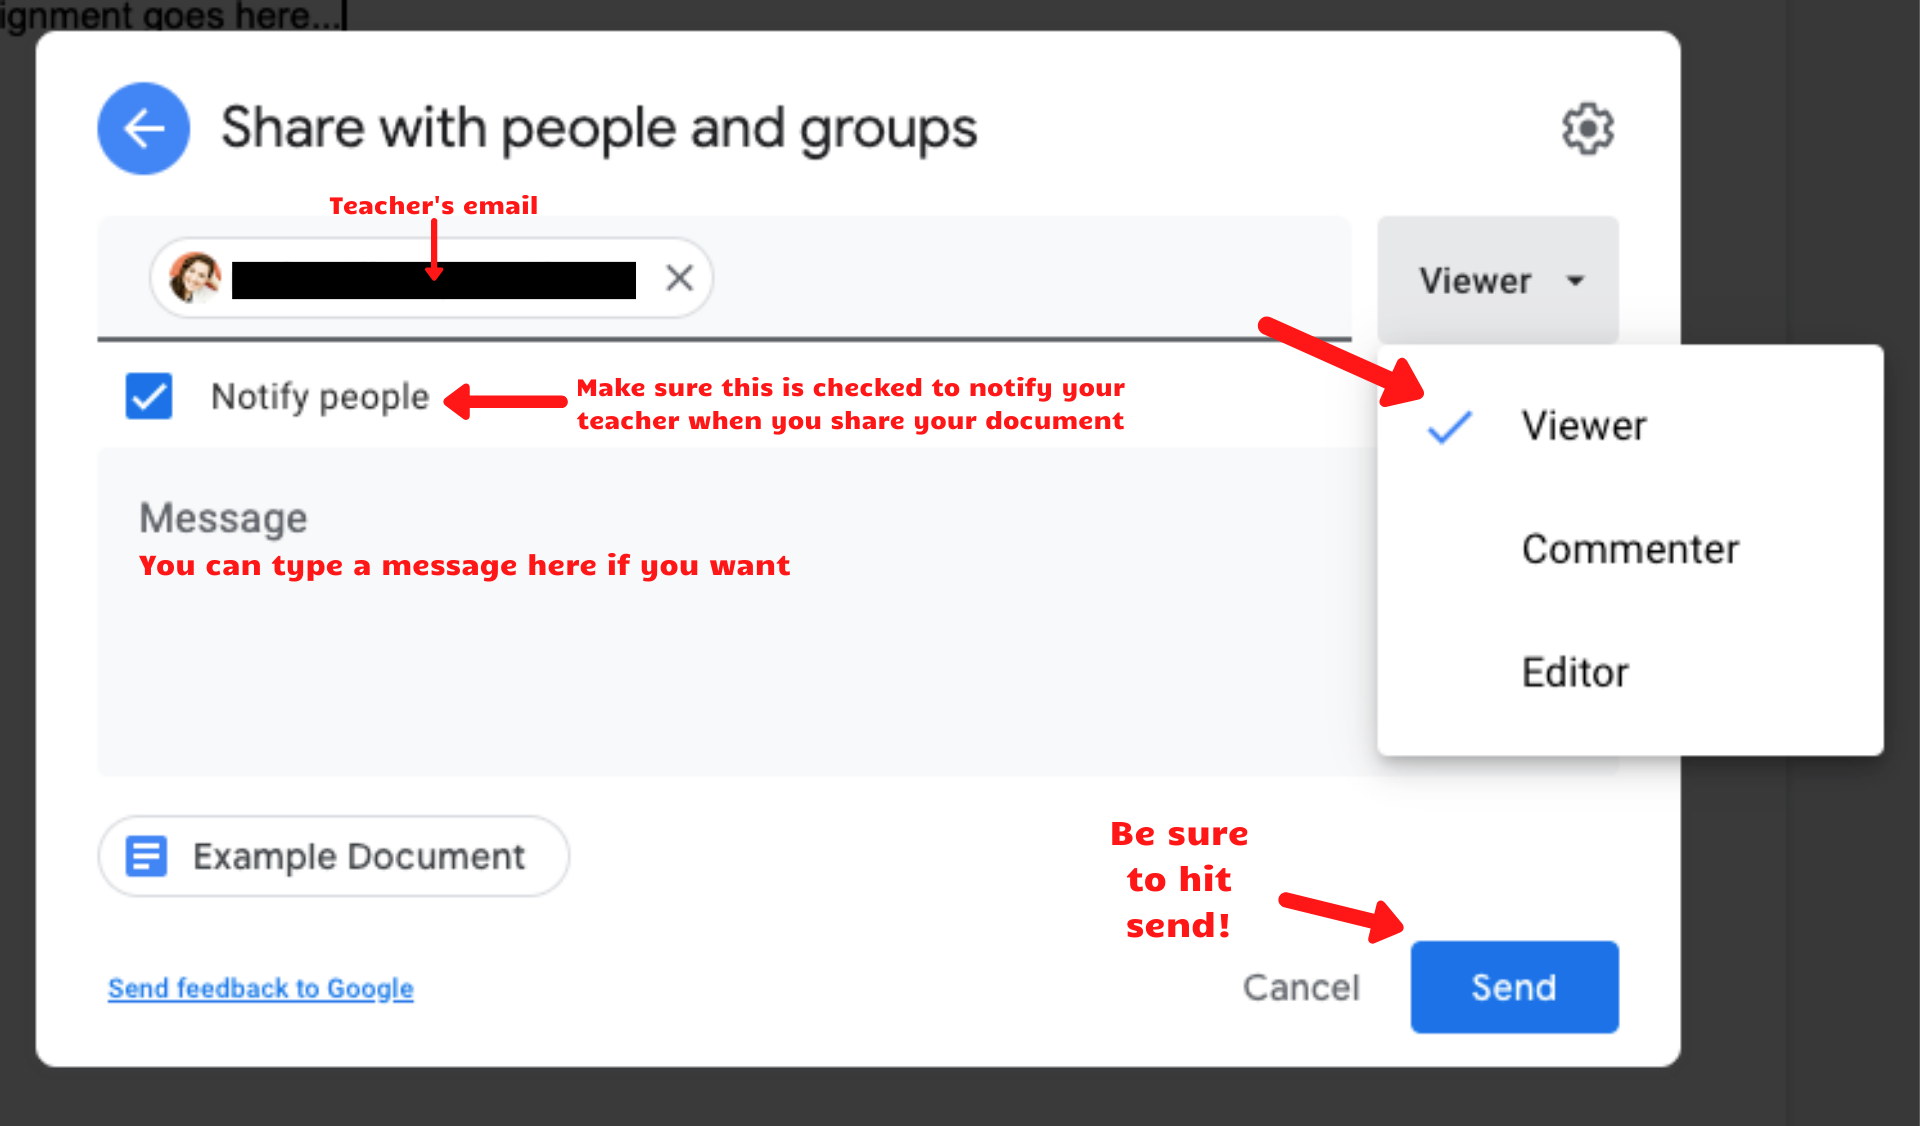
        1. Where it says “Add people and groups,” type in your teacher’s email.
        2. Make sure they at least have the teacher permission to view.

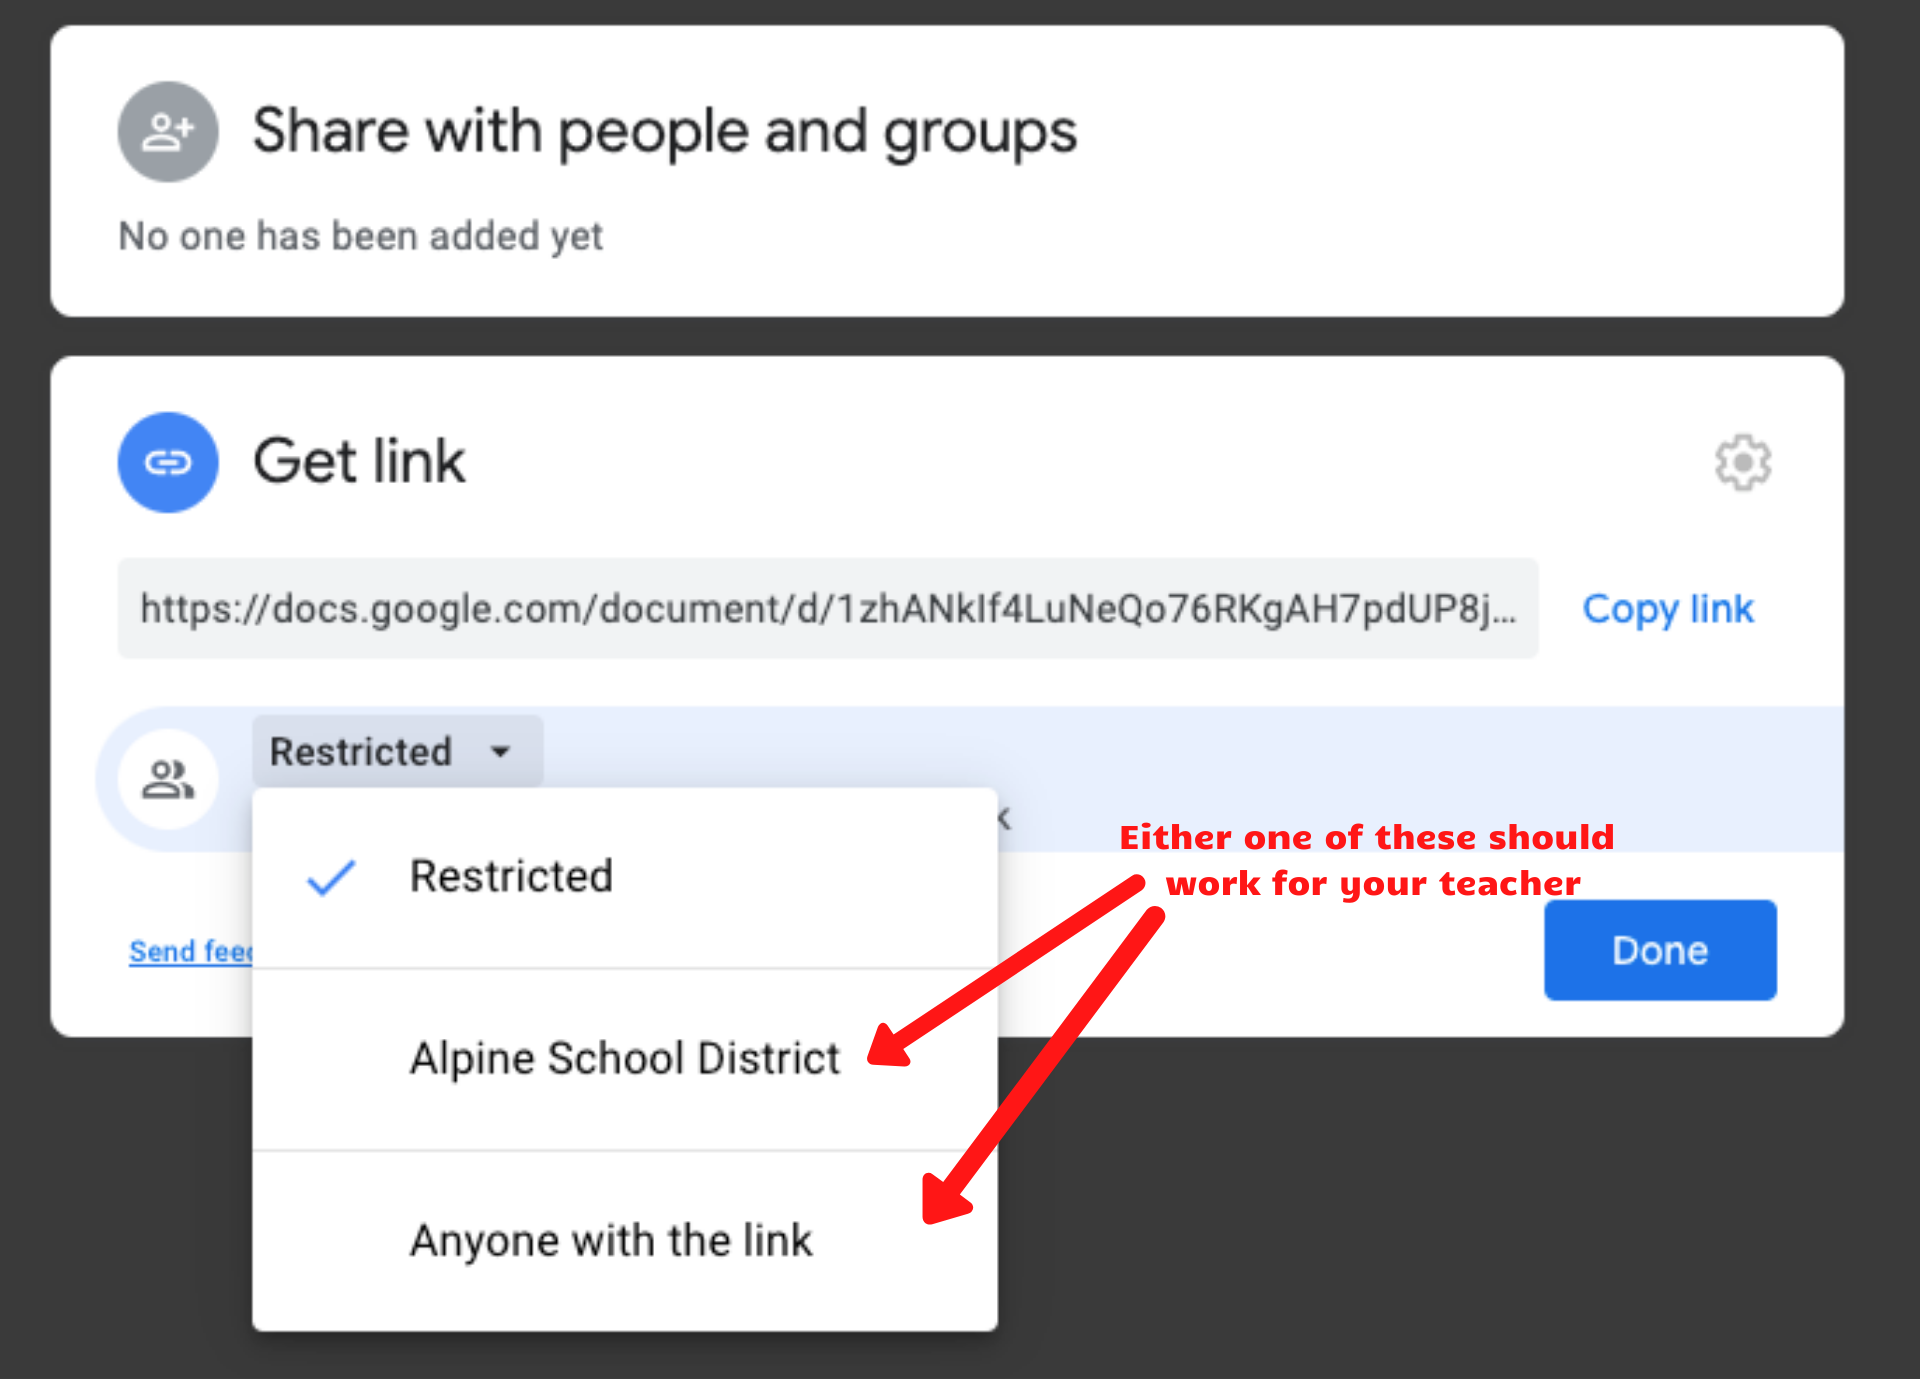
    2. To get a shareable link:
      1. Click anywhere in the “Get link” box to make changes.
      2. Click on the option that says “Restricted” and then change to “Anyone with link.”
        1. From here, you can change it so those with the link can be a “Viewer,” “Commenter,” or an “Editor.” Make sure the teacher can at least view it.
        2. Click “Done” at the end
        3. Be sure to copy the link and email your teacher with the link, letting them know the assignment has been finished and updated for them to view.